

Rich, buttery brioche bread. This delicious traditional French bread recipe makes either 2 loaves or 6 buns, featuring a glossy crust and a light fluffy bread interior. With this recipe you can easily make your own brioche bread at home; it’s perfect for French toast (pain perdu), sandwiches, breakfast toast, or even dipping into a cheese or chocolate fondue!
Buttery, soft and delicious, with a faint hint of vanilla. This bread is just to die for! It’s brilliant for making French toast, known traditionally as pain perdu, but you can also use this bread for bread pudding, sandwiches, cheesy garlic bread, or even just plain buttered toast. If you’re feeling extra decadent, cut the bread up into cubes and serve it with a melted cheese or melted chocolate fondue.
Since this bread does contain eggs, butter and milk, you should store the baked loaves in the fridge or freezer. This bread keeps well in a sealed bag the fridge for about a week, or in the freezer for up to 2-3 months. I often pre-slice my bread before freezing, and it doesn’t lose much or any of its freshness – just pop a slice in the toaster or the oven when you’re ready for fresh bread.

There are a few steps to making really delicious brioche bread at home, so let’s go over them:
- Use warm milk. Make sure the milk is heated to about 110˚F. If you don’t have a thermometer to test the temperature then test it by feel – but, please don’t burn yourself. The water should be warm but not unbearable – you could keep your finger in it for at least 5 seconds and not be hurt by it. I usually heat the milk in a saucepan on the stove until it is just about break into a simmer.
- Bloom the yeast for 20 minutes with warm milk and sugar. The sugar and warm milk are the ultimate secret to great bloomed yeast for brioche bread. Mix these three ingredients together in a bowl, then cover the bowl with plastic wrap and a tea towel. Let it sit for 20 minutes to get nice and bubbly and bloomed.
- Mix the salt and half the flour with bloomed yeast. Mix the salt together with 3 cups of flour in a large mixing bowl, then add the bloomed yeast/sugar/warm milk mixture. This will cool down the warm milk mixture enough that it is safe to add the eggs to the dough without causing them to cook.
- Add the beaten eggs and vanilla. Knead the beaten eggs and vanilla extract into the dough. Make sure you are using room temperature eggs.
- Add the remaining 3 cups of flour. Now you can knead the rest of the flour into the dough.
- Knead the dough by hand for 15 minutes while adding the soft butter. Knead the dough for 10-15 minutes by hand or using a spatula if it’s still a bit sticky. While you knead the dough, gradually add in spoonfuls of the soft room temperature butter. You can add up to an extra third/half cup of flour if the dough is too sticky, but error on the side of less is more.
- Please don’t use an electric mixer. Electric dough mixers can overwork the dough all too easily, and then you’ve wasted your perfectly bloomed yeast.
- Oil and cover your dough for the first two rises. For for the first two rises, make sure both the dough and the inside of the bowl are coated with olive oil, and that it is then covered with plastic wrap ( you can also add a tea towel for extra protection). You don’t want your precious dough to dry out, especially brioche since it includes eggs and butter.
- Let the dough rise three times: 2 hours in a warm place, overnight in the fridge, then 30 minutes on the tray before baking.
- Rise #1 (room temp, 2 hours): Let the dough rise for 1-2 hours in a warm place. It should be oil and covered in plastic wrap.
- Rise #2 (in the fridge, 12 hours): Punch the dough down, knead it for a minute or two, rub it with a little olive oil so it doesn’t dry out, cover it with plastic wrap and stick it in the fridge overnight (12 hours is perfect). You can honestly let it rise a bit longer in the fridge if you want – up to 24 is okay.
- Rise #3 (room temp, 30 mins): Let the dough rise once more on the baking tray itself, after it’s been shaped into loaves or buns, but before the egg wash has been applied.
- Decide on your bread shapes – loaves, braided loaves, or buns.
- Simple loaves: For the easiest brioche bread, just divide the dough into 2 loaves and shape them into a standard oblong loaf shape.
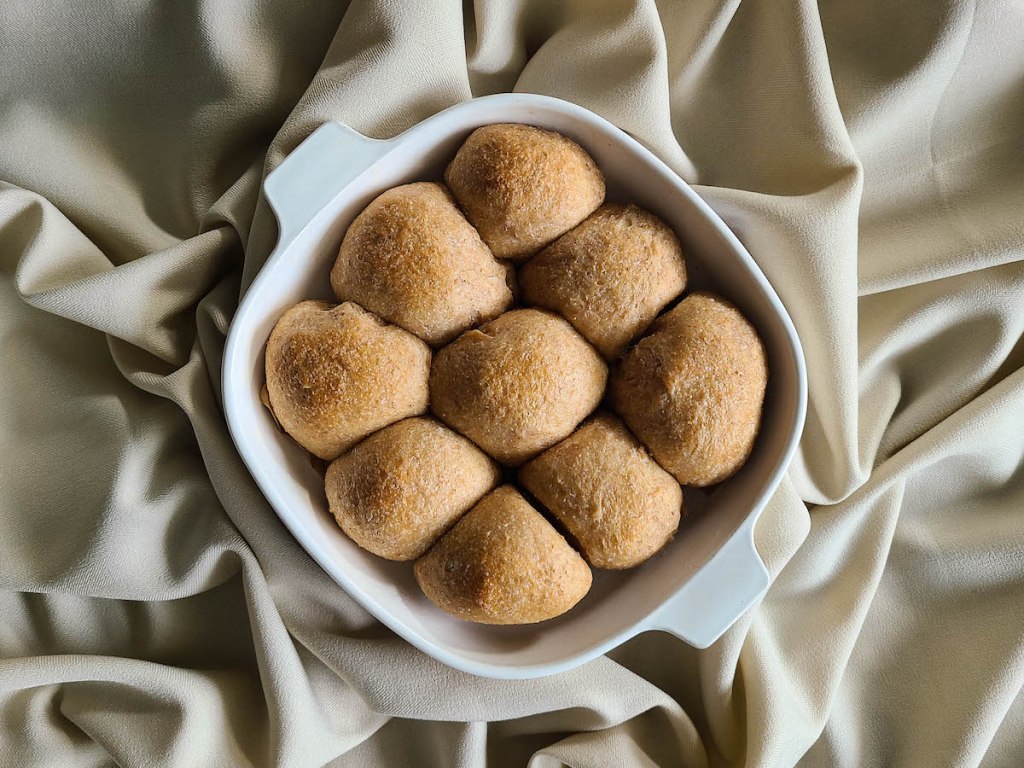
- Sandwich buns: You can also divide the dough into 6 equal portions, roll them into round spheres, and bake them like that to have 6 perfect hamburger or sandwich buns.
- Braided loaves or buns. Slightly higher difficulty is braided brioche dough. I’m not great at this either, but that’s just another reason to practice and make lots of bread at home.

How To Braid Brioche Bread?
There are two fairly common braids – the 3 strand braid and 5 strand braid. You can also make a 4 strand braid; its instructions are very similar to the 5 strand braid.
Three Strand Braid
- Divide into Three Equal Portions: Divide your dough into three equal portions.
- Roll Each Portion into Ropes: Take one portion of dough and roll it out into a long, even rope. Repeat this process with the other two portions so you have three strands of equal size.
- Start the Braid: Place the three ropes next to each other horizontally on your work surface. Pinch the tops of the ropes together to secure them.
- Braid the Dough: Begin braiding the dough as you would with a hair braid. Cross the right rope over the middle rope, then the left rope over the new middle rope (which was the right rope in the previous step). Continue alternating between the right and left ropes, always crossing them over the middle rope until you reach the end.
- Seal the Ends: Once you’ve braided the entire length of the dough ropes, pinch the ends together and tuck them under the loaf to seal them in place.

Five Strand Braid
- Divide into Five Equal Portions: Divide your dough into five equal portions.
- Roll Each Portion into Ropes: Take one portion of dough and roll it out into a long, even rope. Repeat this process with the other two portions so you have five strands of equal size.
- Start the Braid: Lay the five ropes next to each other horizontally on your work surface. Pinch the tops together to secure them.
- Braid the Dough: Begin the braid by numbering the ropes from left to right: 1, 2, 3, 4, and 5. Cross rope 1 over rope 2, then cross rope 3 over the new rope 2 (which was originally rope 1). Now, cross rope 5 over the new rope 3, then repeat the process, always crossing the outermost rope over the new rope 2 in the centre. Continue until you reach the end.
- Seal the Ends: Pinch the ends together and tuck them under the loaf to seal.
Go slowly the first time you do a braided loaf like this. You can even practice beforehand with some pieces of string until you get the pattern down.

A few more tips…
- Shape or braid the bread into loaves or buns before the 3rd rise. Shape or braid your dough before the third rise, so that they can become a bit more comfortable and relaxed in form before baking.
- Add egg wash. Use a pastry brush to coat the loaves with beaten egg just before baking. This will give them a beautiful warm exterior colour.
- Bake the bread at 350˚F for 30 minutes. Being that this is a more delicate and cake-like French bread, an oven temperature of 350˚F is perfect.
- Store your baked bread in the fridge or freezer. This bread keeps well in a sealed bag in the fridge for 7-10 days, or in the freezer for 2-3 months.

Buttery Brioche Bread
Iconic buttery French bread, ready from start to finish in about 17 hours.
This recipe makes 2 loaves of bread or 6 buns.
Mixing and Kneading: 1 ½ hours, over the course of the recipe
Rise #1: 2 hours
Rise #2: 12 hours
Rise #3: 30 mins
Bake Time: 30 mins
Ingredients
- 2 cups milk, either plant-based or dairy milk
- 1 cup sugar
- 1 ½ tbsp active dry yeast
- 6 cups flour, plus ½ cup flour for kneading and dusting
- 1 tsp salt
- 6 eggs, room-temperature and beaten
- 2 tsp vanilla extract
- ¾ cup softened butter
- 2-3 tsp olive oil
- 1 egg, for the egg wash

Tools
- measuring cups
- measuring spoons
- mixing bowls
- mixing spoon or spatula
- dough mat (a large cutting board or clean countertop will also work)
- plastic wrap
- tea towel
- dough cutter or sharp knife
- small dish
- pastry brush
- baking sheet
- oven mitts
Instructions
- Heat the milk in a small saucepan until warm about 110-115°F. Pour the warmed milk into a heat-safe bowl and combine with the yeast and sugar. Mix gently, cover, and let sit for 20 minutes.


- Add the salt and 3 cups of the flour to a large mixing bowl.
- Pour the warm milk mixture into the bowl with the flour, then stir to combine and form a dough.


- Beat the eggs in a bowl with the vanilla extract, then add them to the dough.


- Slowly knead in the remaining 3 cups of flour. Add up to ½ cup extra flour if the dough is too sticky.
- Gradually incorporate spoonfuls of softened butter, until the butter is fully mixed in and the dough is smooth and elastic. Knead the dough for 10-15 minutes in total while adding the butter. Use a spatula to mix the dough if it’s still too sticky.


- Coat the dough with 1 tsp oil, then cover with plastic wrap and let rise for 1-2 hours in a warm place.
- Punch the dough down and fold it over several times. Coat the dough in a little more oil and re-cover with plastic wrap. Place the dough in the fridge overnight, for at least 12 hours.


- Transfer the dough to a lightly floured surface and divide into 6 equal pieces.
- To make a braided loaf, roll 3 pieces of dough out into long thin strands. Braid them together. Pinch the dough strands at each end to close off the braid. Repeat this with the 2nd loaf. To make 6 buns instead of 2 loaves, simply roll out the 6 dough portions into 6 balls.
- Place the braided loaves or dough balls to a lightly oiled baking tray. Cover the dough with plastic wrap or a damp towel and let rise for another 30 minutes.
- Preheat the oven to 350˚F.
- Beat the single egg in a small bowl, then use a pastry brush to paint the dough with the egg wash.
- Bake the brioche at 350°F for 30 minutes, or until a toothpick pulls out clean.


The 17th Century Aristocrats & Their Bread
Did you know that brioche bread was created in the 17th century in France?
Apparently the pâtissier who is credited with being the father of brioche, Jean-Baptiste Christophe, was trying to elevate the traditional bread of the time. So, of course, he added butter, eggs, sugar, and vanilla.
As you can imagine, brioche was insanely popular, but largely only affordable to make amongst the aristocracy.
The word “brioche” is actually derived from the old French word “brier,” which means “to knead.” Who’d have thought?
Anyways, it’s truly delicious. While brioche might still be a luxury today and not your everyday basic bread, it’s certainly the perfect bread for special occasions and iconic pain perdu.
Did you make this homemade French bread? Let me know!


Leave a comment